
6 Basic Photography Tips Everyone Should Know

Photography may have a steep learning curve but don’t let that stop you from taking a shot!
From curating everyday memories to stepping up your Instagram game, photography is a hobby for everyone.For basic photography tips, everyone should know the importance of resizing images for various platforms. Utilize tools like the Adobe Express image size converter to easily adjust your photos to the perfect dimensions.
If you think you’ve nailed the basics of photography, check out this Singapore corporate video production company for more tips on filming and video production!
If you’re looking to spice up your photos, why not try animating still photos? Depending on your capabilities, you can either animate still photos by yourself using software or hire a professional animation studio if you have the budget.
However, if you’re a complete newbie to photography, we’ve got you covered in this guide on basic photography tips!
1. Know Basic Photography Terms
They may sound intimidating but they’re really simple. While there are entire glossaries dedicated to photography terms, you only need to know the 3 pillars of photography as a beginner.
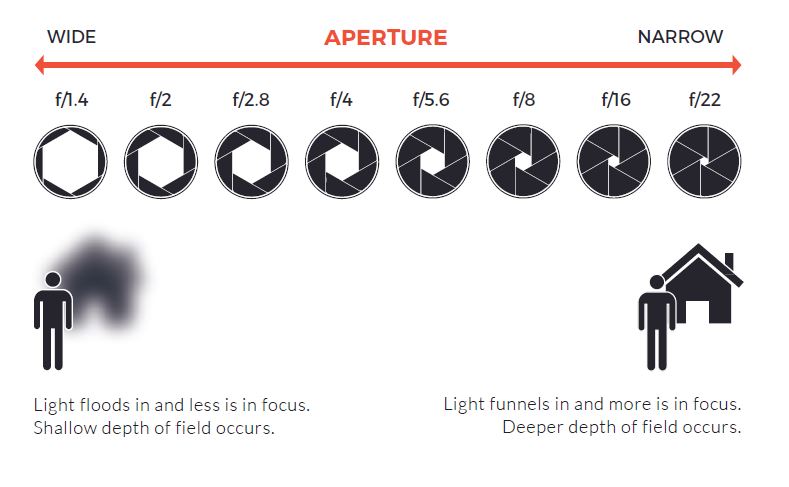
1. Aperture
Your aperture is the opening of your lens, this is where light enters your camera. The wider the aperture, more light passes through. So what happens then?
When more light passes through, your photo becomes brighter. If it’s too bright, it’s overexposed. On the other hand, when less light passes through, your photo becomes a lot darker. In a dark setting, you’d want a wider aperture to get as much light as possible in your photos.
2. Shutter Speed
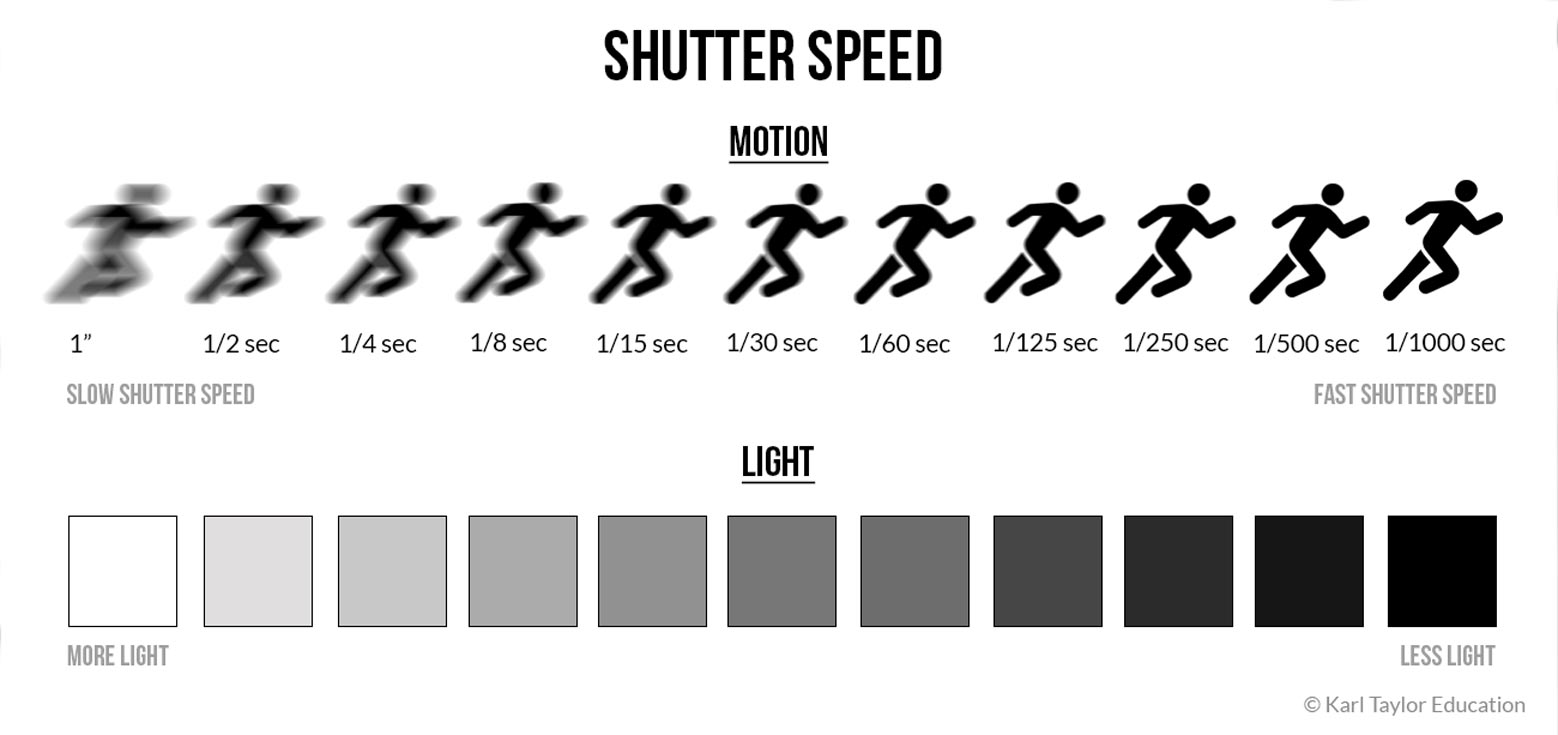
Shutter speed refers to the time the shutter is left open. To capture still images, a higher shutter speed is better but your pictures will also turn out darker since there’s less time to capture light.
Slower shutter speeds are best for motion blurs so adjust it accordingly if you don’t want a blurry picture.
3. ISO
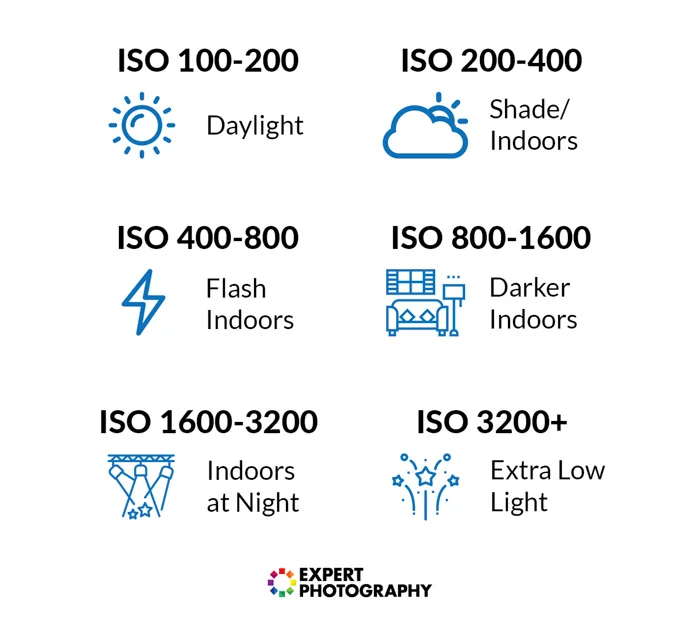
ISO affects the camera’s sensitivity to light. A higher ISO means your camera will absorb more light but it’ll also cause photos to turn out grainier. If that’s a look you’re going for, dial up your ISO accordingly.
Master these 3 aspects and you’ll see an immediate difference in your photography.
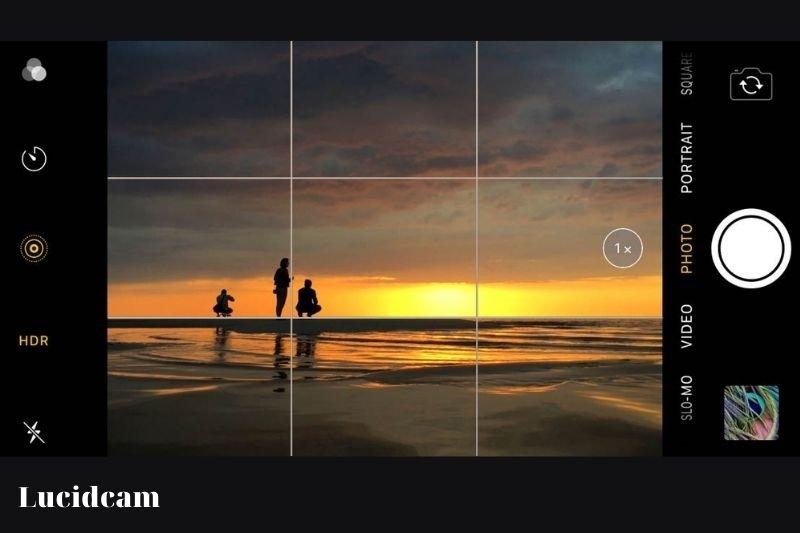
2. Enable The Gridlines
Whether you’re using your smartphone camera or DSLR, you can turn on grid lines on any setting. But why do you need them?
Camera composition is the backbone of photography; basically, it’s how you arrange the elements of your photo. It determines how compelling or visually interesting your photos look. However, it takes time to master it.
For beginners, the rule of thirds is a simple composition guide and if done correctly, your photos will look balanced and well-composed.
All you have to do is divide your photo into a nine-grid box. This helps you visualize where you should position your subject. Enabling grid lines on your camera will give you a better sense of your photo’s visual composition and avoid slanted photos.
3. Play With Camera Angles
High Angle Shot
Taking from a high camera angle makes your subject look weak and vulnerable.

Low Angle Shot
A low-angle shot achieves the opposite effect. Your subject looks powerful and more imposing.

Mid Angle Shot
A mid-shot shows a subject from the waist-up and it’s good for showing them in action.

Over The Shoulder Shot
An interesting angle, over the shoulder, is exactly what its name suggests! It adds some intrigue and suspense to your photo.

Aerial Shot
An aerial shot gives you a bird’s eye view of the scene. It gives you an all-knowing angle and it’s best for showing the scale and vastness of your photos.

4. Make Room For Headspace
Who doesn’t want to post a good photo on social media? However, different platforms will have different aspect ratios and your photos might just get cropped to fit into them.
To prevent your photos from looking too cramped when it’s cropped, make room for headspace. This refers to the space between the top of your subject’s head and the top of the frame.
5. Get A Steady Grip
To prevent blurry pictures, you want to minimise camera shakiness. Even the slightest movement can result in a bit of blurriness.
To steady your grip, hold your phone or camera close to your body. Your arms will be supported by your core, which stabilises them.
But if you’re looking for stability, nothing beats a tripod.
6. Invest In A Tripod
If you plan to capture a non-moving object, a tripod is your best friend. However, it’s also useful in many other ways for photography. It’s great support for heavy lenses and you can frame a shot in any way you like.
Tripods are also great for capturing different angles that you really wouldn’t be able to do on your own. At the end of the day, your arms will thank you for it.
We hope this helps! Now, go out and take some nice shots!


No comments